What Should I Look For When Buying a Telescope?
Let me tell you something that surprises most people: the biggest telescope isn’t always the best telescope. I’ve watched countless friends rush out and buy massive instruments that now gather dust in their garages, while others with modest equipment are out there every clear night mapping the cosmos. The difference? They knew exactly what to look for.
Understanding Aperture: Your Window to the Universe
When you’re shopping for a telescope, aperture is the single most important specification you’ll encounter. It’s the diameter of the main lens or mirror, and here’s why it matters more than anything else: aperture determines how much light your telescope can gather. More light means you can see fainter objects and resolve finer details. A telescope with a 150mm aperture collects about twice as much light as a 100mm one, which makes a dramatic difference when you’re trying to spot a distant galaxy.
Think of aperture like your eye’s pupil dilating in the dark. The wider it opens, the more you can see. Most beginners assume magnification is king, but that’s putting the cart before the horse. You can magnify an image all you want, but without enough light-gathering power, you’re just making a dim, fuzzy blob bigger. A good rule of thumb: your maximum useful magnification is about 50 times your aperture in inches or 2 times your aperture in millimetres.
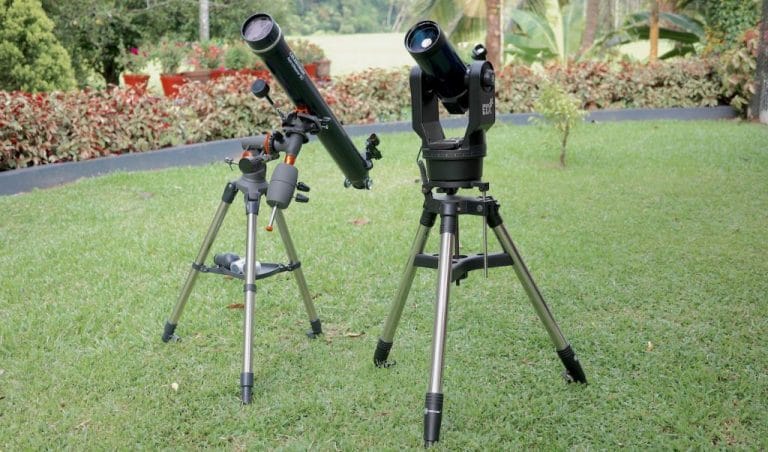
The Three Main Telescope Types (And What They Really Mean for You)
Walk into any astronomy shop and you’ll face three fundamental designs: refractors, reflectors, and compound telescopes. Each has distinct advantages, and understanding them will save you from buyer’s remorse.
Refractor Telescopes: Simple and Reliable
Refractors use lenses to bend light to a focus. They’re the classic telescopes you picture in old observatories, with that long tube pointing skyward. These instruments need virtually no maintenance, provide crisp contrast for viewing planets and the Moon, and handle temperature changes better than their counterparts. The sealed tube keeps out dust and moisture, which means less fuss over the years.
The catch? Quality refractors with larger apertures get expensive fast. A decent 100mm refractor costs more than a 150mm reflector of comparable quality. But for planetary observation and double stars, that extra cost often pays dividends in image sharpness.
Reflector Telescopes: Maximum Aperture for Your Money
Newtonian reflectors use mirrors instead of lenses, which makes them considerably cheaper to manufacture in larger sizes. You’ll get more aperture per dollar spent, making them brilliant for viewing faint deep-sky objects like nebulae and galaxies. A 200mm reflector opens up the universe in ways smaller telescopes simply can’t match.
The trade-off involves maintenance. Mirrors need occasional collimation (alignment), and the open tube design means dust can settle on the optics. Most owners find this a small price to pay for the light-gathering power, but it’s worth knowing upfront. Additionally, reflectors can take 30 minutes or more to reach thermal equilibrium with the outside air temperature, which affects image quality.
Compound Telescopes: Portable Powerhouses
Schmidt-Cassegrains and Maksutov-Cassegrains fold the light path using mirrors and a corrector lens, packing a long focal length into a compact tube. This makes them wonderfully portable and versatile. They’re the Swiss Army knives of telescopes, handling both planets and deep-sky objects reasonably well.
These designs cost more than reflectors of similar aperture and take even longer to cool down, sometimes needing an hour to stabilize. But if storage space or portability matters to you, that compromise might be worthwhile. I know several astronomers who chose 8-inch Schmidt-Cassegrains specifically because they fit in a car boot alongside camping gear.
Mount Types: The Foundation Everything Depends On
Here’s something nobody tells beginners: a superb telescope on a wobbly mount is worse than a mediocre telescope on a solid one. The mount is where your money should go if you’re trying to decide between a larger telescope on a flimsy stand or a smaller one on quality support.
Altazimuth mounts move up-down and left-right, just like pointing your finger at something. They’re intuitive, stable, and less expensive. The popular Dobsonian mount is essentially an altazimuth design optimized for Newtonian reflectors, offering remarkable stability at budget-friendly prices. Many observers swear by “Dobs” because you can spend less on the mount and more on aperture.
Equatorial mounts align with Earth’s rotation axis, allowing you to track objects with a single motion. This becomes essential for astrophotography or high-magnification planetary work, where objects drift across the field of view quickly. The learning curve is steeper, but once you understand polar alignment, tracking celestial objects becomes second nature.
Focal Length and Focal Ratio: The Numbers That Shape Your Views
The focal length determines your telescope’s magnification with any given eyepiece, calculated by dividing the telescope’s focal length by the eyepiece focal length. A 1000mm telescope with a 10mm eyepiece gives you 100x magnification. Simple math, but it shapes your entire observing experience.
The focal ratio (written as f/5, f/8, etc.) tells you whether your telescope is “fast” or “slow.” Lower numbers mean faster focal ratios, which produce wider fields of view and brighter images at lower magnifications. An f/5 telescope excels at sweeping vistas of star clusters and nebulae. Higher ratios like f/10 or f/15 provide narrower, more magnified views perfect for planetary details and splitting close double stars.
What’s your observing style? Do you want to drink in the Pleiades in all their glory, or scrutinize cloud bands on Jupiter? This question should guide your focal ratio choice more than any specification sheet.
Eyepieces and Accessories: Don’t Forget the Details
Most telescopes come with at least one or two eyepieces, but quality varies wildly. Budget instruments often include basic eyepieces that provide acceptable views but leave you wanting more. Plan to invest in quality eyepieces over time, starting with a good mid-range magnification around 25mm to 32mm for general observing.
A Barlow lens effectively doubles or triples your magnification by increasing the effective focal length, essentially doubling your eyepiece collection. A quality 2x Barlow costs less than multiple eyepieces and provides excellent flexibility. Modern Barlows introduce minimal optical degradation when properly designed.
Consider a red LED flashlight for preserving your night vision while reading star charts. Your eyes need about 20 to 30 minutes to fully adapt to darkness, and one glimpse at a white light destroys that adaptation instantly. A moon filter helps when viewing our natural satellite, which can be blindingly bright through larger apertures.
Portability Versus Aperture: The Eternal Compromise
The best telescope is the one you’ll actually use. I can’t stress this enough. An 8-inch Dobsonian gathering dust in your attic loses to a 4-inch refractor you cheerfully carry to the backyard three times a week. Think honestly about your situation.
Do you have a dark observing site you need to drive to? Will you be hauling equipment up stairs? A collapsible Dobsonian or a compact Maksutov might suit you better than a traditional long-tube design. If you have a dedicated observing space or a permanent setup location, portability matters less than raw performance.
Weight matters too. A fully loaded 10-inch Schmidt-Cassegrain with mount and accessories can exceed 30 kilograms. Are you comfortable moving that much equipment regularly? Be realistic.
Budget Considerations: Where to Spend and Where to Save
Quality telescopes start around $300 to $500 for basic 4-inch to 6-inch instruments that will genuinely show you celestial wonders. Anything significantly cheaper often uses poor optics or unstable mounts that create frustration instead of inspiration. The astronomy community has a saying: “buy once, cry once.” Investing in quality equipment upfront saves money over replacing disappointing purchases.
Used telescopes offer excellent value if you know what to inspect. Optics should be clean without scratches or coating damage. Mounts should move smoothly without excessive play. Mechanical components should be intact. Many astronomy clubs have members selling equipment as they upgrade, and these insiders often maintain their gear meticulously.
Don’t forget ongoing costs. Some telescopes need periodic maintenance like mirror recoating every decade or so. Batteries for computerized mounts add up. Building an eyepiece collection happens gradually. Budget for these expenses from the start.
Light Pollution and Location: Matching Telescope to Environment
Your observing location dramatically impacts what telescope features matter most. Urban observers fighting light pollution benefit from narrowband filters and instruments optimized for planetary viewing, since bright planets cut through light pollution better than faint nebulae. The Moon and planets remain spectacular even from city centers.
If you’re blessed with dark country skies, a large-aperture Dobsonian becomes a gateway to visual splendor. Faint galaxies, subtle nebula details, and countless star clusters fill your nights. The same telescope in the city shows less, though still plenty to justify the purchase.
Some telescopes handle temperature swings better than others. Refractors and well-made compound scopes adapt faster than large reflectors, which matters if you’re stepping outside for quick observing sessions. In humid climates, closed-tube designs resist dew formation longer than open tubes.
Making Your Final Decision
Start by writing down what excites you most. Crisp details on planetary surfaces? Hunting faint galaxies? Sweeping through rich star fields? Different telescopes excel at different tasks, and knowing your primary interest helps narrow options considerably.
Visit astronomy clubs or star parties before buying if possible. Nothing beats looking through different telescopes and handling various designs. Most astronomy enthusiasts love sharing their equipment and insights. You’ll quickly discover which eyepiece height feels comfortable, which focuser design you prefer, and whether computerized tracking appeals to you.
Read reviews from multiple sources, particularly user reviews from people who’ve owned equipment for months or years. Initial excitement often differs from long-term satisfaction. Look for patterns in feedback rather than isolated opinions.
Remember that no single telescope does everything perfectly. Even professionals own multiple instruments for different purposes. Your first telescope probably won’t be your last, and that’s okay. It’s your entry point into a lifelong journey of discovery.
The universe is waiting up there every clear night, full of wonders that have inspired humanity since we first looked up. The right telescope brings those wonders into focus, transforming distant lights into worlds you can explore. Choose thoughtfully, start observing, and you’ll understand why people get hooked on this remarkable hobby. Clear skies ahead.